 Documentation
Build your first agent
From an installed platform to an agent that is running, answering, and visible on the board — in about forty minutes, with nothing to write but prose.
A support triage assistant: somebody describes a problem, and the agent replies with a plain answer and the one thing it needs them to confirm. One model call, one channel in, one channel out.
That is deliberately the smallest thing worth deploying. It exercises every part of the lifecycle — describe, validate, test, deploy, start, talk to it, watch it — without teaching you two ideas at once. The next tutorial gives it tools.
1 · Open the Studio and make a project#
- in the Studio Open
http://127.0.0.1:5174. The title bar reads Symphonix Studio, and across the top you should see the project's path, then the flow's version and its node and edge counts — something likev0.33 · 5 nodes · 5 edgesif a flow is already open. - in the Studio Sign in if you are asked. If you are not asked and you expected to be, stop: the Studio could not reach the Control Panel when the page loaded. Confirm the board is up and refresh this page — restarting the Studio is not what fixes it.
- in the Studio Find the second bar. On the left it says FLOW with a list of flows; on the right it says PROJECT with the project's name, and two buttons: Open project… and Deploy all….
- in the Studio Press Open project… and choose the folder you want your flows to live in. A project is a folder of flow files; you can use the one that is already open while you learn.
The PROJECT label in the second bar names the folder you chose, and the FLOW list beside it shows the flows in it. An empty project shows an empty list, which is correct.
2 · Create the flow#
- in the Studio Press the + button next to the FLOW list. A new flow is created and opened on the canvas.
- in the Studio Look at the panel down the right. Its first tab is FLOW, and that is where a flow's own settings are. The tabs beside it are CHAT TEMPLATE, PAGE, VIEWS, IN & OUT, MCP SERVERS, KNOWLEDGE, DATABASES, SERVICES, SETTINGS, TOOLS and STATE.
- in the Studio On the FLOW tab, fill in these fields:
Field What to put NAME Support triage. This is what people call the flow — it is shown in the FLOW list and on the Control Panel's board.DESCRIPTION Reads a described problem and replies with a plain answer and the one thing it needs confirmed.Write it as a sentence about what the agent does. It is not decoration: it is handed to the model and to anything that generates code for this flow.VERSION Leave it at the highest offered — 0.33. This is the language version, and the flow gets exactly that version's features.CONVERSATION remembers the conversation, so a second question can say "and that one".KIND Leave it as yours - can be deleted. - in the Studio Leave ID alone. It is generated once when the flow is first saved and never again — triggers, deployments and the Control Panel all address this flow by it, never by its name.
A copy of a flow saved elsewhere gets an ID of its own, which is what stops two copies being mistaken for one agent on the board. It also means you cannot make a flow "become" another one by renaming it.
3 · Say what the agent holds — the state#
Before any step exists there have to be channels for them to read and write. Channels are the agent's state: named, described and declared up front. Every generated function and every prompt is written against these descriptions, so they are worth a careful sentence each.
- in the Studio Open the STATE tab on the right-hand panel.
- in the Studio Add a channel called
request, of type string, described asWhat the person described, in their own words. - in the Studio Add a second called
answer, of type string, described asThe reply to show the person, in plain sentences. - in the Studio Open the IN & OUT tab. Set the flow's input to
requestand its output toanswer. This is what connects the chat page to the agent: what somebody types lands inrequest, and whatever ends up inansweris what they are shown.
The descriptions are the contract the rest of the flow is built against. When the platform generates code for this flow, every channel's description goes into the context of every generated unit — so one set of words reaches all of them, and five functions are not written against five different readings of what answer means. A channel described as the reply and a channel described as the reply to show the person, in plain sentences produce measurably different agents.
4 · Add the step that does the work#
- in the Studio Click on the canvas to add a node, or use the Ask bar down the left — see the alternative path below. A new node appears and the right-hand panel becomes that node's settings, with its own tabs: NODE, IF IT THROWS, BEFORE IT RUNS and DANGER.
- in the Studio On the NODE tab, set ID to
answer_them. An ID is how everything else in the flow refers to this step. - in the Studio Set KIND to
llm. The full list the Studio offers ishandler,llm,tool,tools,fanout,ask,form,read,flow,agent,work,knowledge,indexanddatabase.llmasks a model something and writes the reply to a channel. - in the Studio Fill in DOES:
Reads the described problem and writes a plain reply with the one thing that needs confirming.This is the step's own one-line purpose, and it shows in the node's summary box at the top of the panel beside what it reads and what it writes. - in the Studio Fill in PROMPT. The channels are available as
{{name}}, and the panel lists which ones you may read directly under the OUTPUT field:You are a support triage assistant. Somebody has described a problem: {{request}} Reply in plain sentences. Say what you think is happening and what you would do about it. End with the single most useful thing you need them to confirm. Do not invent product names, version numbers or error codes that are not in what they wrote. - in the Studio Set OUTPUT to
answer. That is the channel this step writes. - in the Studio Leave ANSWER SHAPE (JSON) empty. It is for a step whose answer has to have a structure; this one writes prose. The next section explains when you need it.
- in the Studio On the FLOW tab, set START to
answer_them, then connectanswer_themto END on the canvas. - in the Studio Press Save in the top bar.
The alternative path — the Ask bar#
Everything in sections 3 and 4 can be done by describing it instead. The Ask bar is the panel down the left of the Studio; it says Describe a change and it is made to the flow on the canvas. Ask again to carry on — the last few turns go with each request.
- in the Studio Type what you want and press Enter (Shift+Enter for a new line). For this agent:
Add a string channel "request" for what the person described and a string channel "answer" for the reply. Add an llm node "answer_them" that reads request and writes a plain answer ending with the one thing to confirm. Make it the start and connect it to END. - in the Studio Check what it did on the canvas and in the panels. It writes the flow; it does not decide whether the flow is right. Read the STATE tab and the node's PROMPT before going on.
- in the Studio Clear starts a fresh conversation with it; Send is the same as Enter.
Which to choose. Use the Ask bar when you know what you want and the typing is the tedious part, and the panels when you are learning what the fields mean — which, on a first agent, is the point. Both produce the same file, and you can move between them at any time. The two paths rejoin here.
5 · Read the Problems bar#
Along the bottom of the Studio is PROBLEMS. It is not something you run: it is the validator's standing opinion of the flow, and it updates as you work.
- in the Studio Look at the bottom bar. A sound flow reads
✓ valid ✓ ready to generate, followed by a count of hints if there are any. - in the Studio Read any hint in full. Each one names a code, says what is wrong in a sentence, and ends with the exact place in the file it came from. A real one looks like this:
LLM_OUTPUT_UNSTRUCTURED   Node "decide" writes 'next_step' (a object) from a
model without saying what shape it must have: add "schema" and an answer that
does not fit is a failure rather than bad data        nodes[0].schema
Valid means the flow is a legal flow for the language version it declares — a refusal here is absolute and nothing will deploy. Ready to generate means the readiness checks are satisfied: these are about whether the agent will behave sensibly, and some of them are warnings you may knowingly ship with. The hint above is one of those. Our agent writes prose into a string channel, so it does not apply; it applies when a model writes an object without being told what shape it must have.
The bar reads ✓ valid and ✓ ready to generate. If it does not, fix what it names before deploying — a flow that is not valid cannot produce a project.
6 · Talk to it before deploying#
Play runs the flow from the folder, right now, so you can have a conversation with it without deploying anything.
- in the Studio Press ▶ Play in the top bar.
- in the agent's chat A chat opens. Type a realistic problem —
Our nightly export has been finishing with no rows for three days. Nothing changed that we know of.— and press Send. - in the agent's chat Read the reply. It should be plain sentences, should not invent an error code, and should end with one thing to confirm. New conversation starts over; Stop ends the run.
- in the Studio Change the PROMPT and try again until the replies are what you want. This loop is much faster than deploying.
They are two copies of one agent. The Control Panel notices, refuses to register the second, and that copy stands down — it writes a pause, stops its clocks and refuses at its own door. Nothing undoes it when the other copy goes away. The symptom is a sign-in refused with that is not this agent's own address, which describes a different problem entirely. Press Stop before you start a deployed copy.
7 · Deploy it#
Deploying writes a complete, self-contained Node project: your flow, the generated code, the engine vendored and pinned inside it, a Dockerfile, a .dockerignore and an .env.example.
- in the Studio Press Deploy in the top bar — the icon between Save as and Deployment settings, whose tooltip reads Deploy - generate a working project from this flow. It deploys the flow on screen.
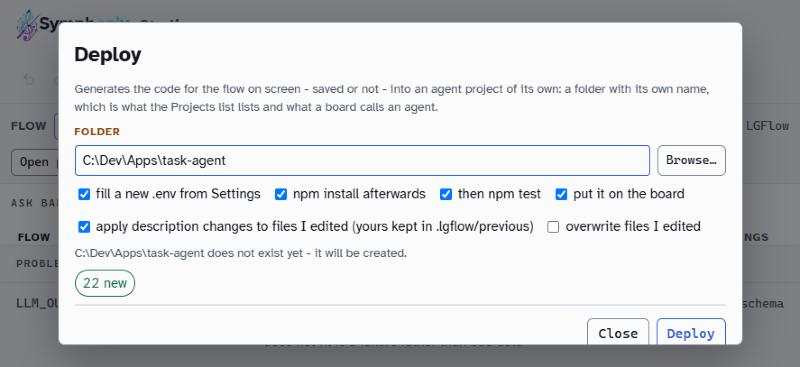
- in the Studio The Deploy dialog opens. Set FOLDER to where the project should be written — a new, empty folder. Underneath, the dialog says whether that folder exists yet and how many files it is about to write.
- in the Studio Decide the checkboxes. These are the real ones:
Option What it does, and what to choose now fill a new .env from Settings Writes a .envin the new project from the Studio's own settings, so the agent has its model key. Tick it for a first deployment.npm install afterwards Installs the project's dependencies. Tick it, or you will do it by hand. then npm test Runs the generated project's own tests. Worth ticking. put it on the board Registers the agent with the Control Panel so it is expected before it has ever run. Tick it. apply description changes to files I edited Only matters when redeploying over a project whose generated files you have edited by hand. Your previous versions are kept in .lgflow/previous.overwrite files I edited The blunt version of the one above. Leave it off. - in the Studio Press Deploy and watch it work. It reports as it goes and says plainly if it finished with failures.
The second bar carries Deploy all… beside the project name. It is not this dialog. Its own tooltip says what it does — Deploy every flow shown in this list, each back to the project it was deployed to — so it has no FOLDER field: it redeploys every flow the FLOW list is currently showing, back to wherever each one went last time. On a project with nineteen flows in it, that is nineteen deployments from one press. It is a maintenance tool for later, not a way to deploy your first agent.
The dialog reports a finished deployment, and the folder you named now contains run.js, a package.json, your flow, a vendor/ directory holding the engine as a pinned tarball, a Dockerfile and an .env.example. If you ticked npm install afterwards there is a node_modules too.
8 · Start it#
- on the machine Open a terminal in the folder you deployed to and start it:
node run.js - on the machine Read the address it prints. With no
PORTset, the agent asks the operating system for a free port, so it is different on every start and the agent prints what it got. Do not assume a number. - on the machine Look for the line saying it registered with the Control Panel. No such line means the board was not reachable when it started.
8080 is the container's port: the generated Dockerfile sets ENV PORT=8080 and the docker run line publishes it. An agent run from a folder with no PORT gets whatever the operating system gave it. Read the line it printed.
9 · Talk to it, and watch it#
- in the agent's chat Open the address the agent printed. This is the agent's own chat page, served by the agent itself — not by the Studio and not by the Control Panel.
- in the agent's chat Ask it the same question you asked in Play. The answer should be recognisably the same agent.
- in the Control Panel Open the Control Panel at
http://127.0.0.1:5180. Your agent should be listed, with the name you gave the flow. - in the Control Panel Open it and look at its runs. The conversation you just had is there, with what each step did.
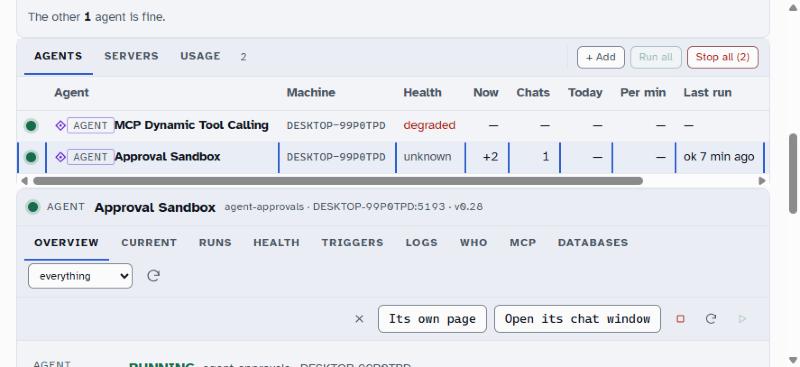
unknown under Health means nothing has asked it, which is not the same as a failure.- The Studio's PROBLEMS bar reads
✓ valid ✓ ready to generate. - The deployed folder exists and contains
run.jsand avendor/directory. node run.jsstarts and prints an address.- That address serves a chat page, and the agent answers a question sensibly.
- The Control Panel lists the agent, and the conversation you had appears in its runs.
If all five hold, every component of your installation has been exercised by use rather than by inspection.
If something is not right#
| Symptom | Cause | What to do |
|---|---|---|
| Deploy is greyed out, or says not ready yet | The flow is not valid, or a readiness check refuses it. | Read the PROBLEMS bar. It names the code, the reason and the exact place in the file. |
| Play opens but the agent never answers | Almost always the model key. | Check the Studio's .env has a key for the provider the flow uses. The Studio does not supply one. |
| The agent starts, then stands down | Two copies of one flow — usually Play still running. | Press Stop in the Studio, then restart the agent. Nothing undoes a stand-down on its own. |
| The agent runs but is not on the board | It could not reach MONITOR_URL when it started. | Check that variable in the project's .env, and that the Control Panel is up. From a container the host is host.docker.internal. |
| The reply invents details | The prompt does not forbid it. | The prompt above ends with an explicit instruction not to. That sentence is doing real work; keep it. |
| Nothing appears at the address | You used a port from a previous run. | Read the address from this start. It changes unless PORT is set. |
What to do next#
- Build your first MCP agent — give this agent real tools, so it can look something up instead of only reasoning about it.
- Deploy and monitor — the lifecycle properly: redeploying, containers, health, and reading what a run actually did.
- Writing a flow — the language from the inside, once the shape of one is familiar.
Screen names, panel tabs, node kinds, field labels, the PROBLEMS bar's wording and the deploy dialog's checkboxes were read off a running Symphonix Studio 0.41.0 and are exact. The end-to-end walk — deploying this particular flow, starting it and finding it on the board — has not been performed against a live installation for this edition, so the two screenshots are marked pending rather than fabricated. Beta The verification report that ships with this site lists every such claim.